Revision root canal treatment aims to clean the infection and restore function in teeth that have previously undergone root canal treatment and contain a post. The post narrows the space and increases the risk of fracture. Therefore, the approach should be more conservative than standard revision. The first step is correct diagnosis. Next, the type, length, and retention of the post are determined.
The removal strategy is planned accordingly. The irrigation, shaping, and obturation stages are redesigned. The restorative plan focuses on preserving the remaining dentin. If necessary, the post is repositioned or alternative retention is preferred. The goal is to achieve permanent sealing with minimal tissue loss. The process is multi-step. Systematic progress increases success. Patient education and long-term follow-up also play a critical role.
Revision root canal treatment: Indications and Risk Mapping
Revision Root Canal Treatment: In teeth with posts, indication is guided by symptoms, radiographic findings, and restoration status. Persistent pain, fistula, a periapical lesion, or a leaking restoration initiates retreatment. Because the post adds stress to the root, its removal carries a microfracture risk; therefore remaining dentin thickness, ferrule presence, and periodontal support are carefully assessed. Metal and fiber posts behave differently; tensile strength, friction, and cement solubility shape the plan. First, a coronal seal is established, then controlled access is created for post removal. The objective is to reach the infection source while preserving dentin. The keys to success in Revision Root Canal Treatment are accurate case selection, controlled forces, and stepwise, patient-centered progression.
Checklist:
- Symptoms and vitality history
- Radiographic/CBCT lesion size
- Presence of residual dentin and ferrule
- Post type, length, cementation
- Periodontal and occlusal loads
Revision Root Canal Treatment: Imaging and Preplanning
Revision Root Canal Treatment: In the presence of a post, a single two-dimensional film can be misleading; therefore preoperative radiographs are taken from two angles, and—when available—low-dose CBCT is used to assess root curvature, the post tip, suspected perforations, and isthmus regions. The post’s intraradicular extent and its relationship with surrounding gutta-percha are clarified, while restoration margins and possible secondary caries are reviewed. An access cavity is then planned to preserve enamel-dentin support, coronal seal is ensured, and the isolation strategy is defined. Guide lines aligned with the post axis are prepared, and depth may be marked with a mock-up. Thoughtful planning shortens procedure time, reduces complications, and helps predict the drainage pathway and irrigation dynamics—critical steps for success in Revision Root Canal Treatment.

Planning tips:
- Two angles + CBCT correlation
- Axis alignment lines
- Minimum access cavity
- Rubber dam and clamp selection
- Occlusal contact relief
Post Removal Strategy and Instrument Selection
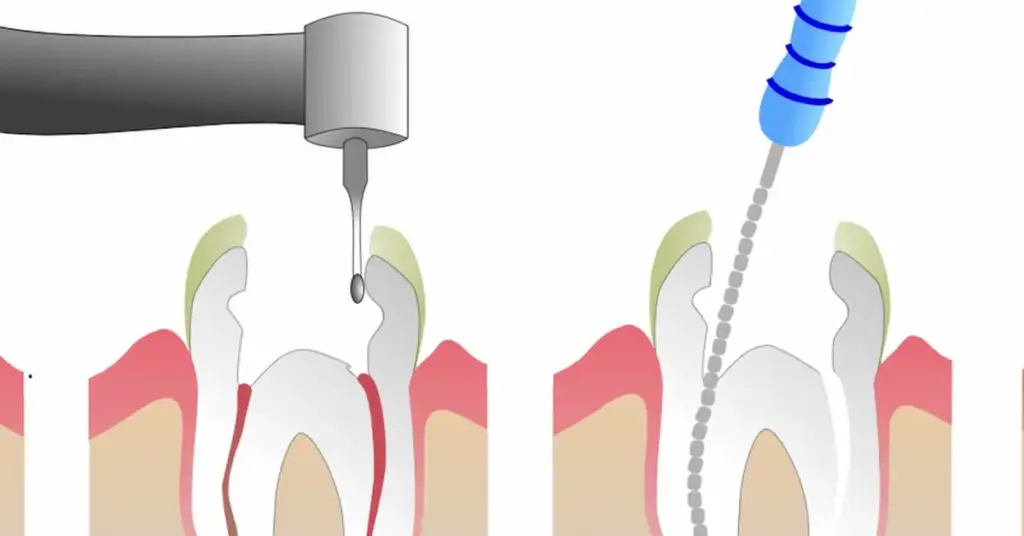
Removal begins with coronal release. Composite and cement residues are cleaned. For fiber posts, stepwise trepanation along the long axis and ultrasonic vibration are effective. For metal posts, heat and microvibration are applied with ultrasonic tips; post pullers are used if necessary. The type of cement is critical: mechanical removal is required for resin-based cements, while solvent support can be applied for eugenol-based cements. Excessive heat and lateral force are avoided. Magnification and coaxial light are used to improve visibility. The goal is to break the retention without thinning the dentin. Once removal is complete, canal patency is confirmed with gentle probing. Glazed surfaces are lightly matted. This makes irrigation more effective and subsequent steps easier.
Recommended instruments:
- Ultrasonic tip sets
- Post extraction instruments
- Fiber post reamers
- Operating microscope/loupe
- Core cleaning reamers
Recontouring and Irrigation of the Canal
After the post is removed, the working length is renewed. The glide path is secured. In curved roots, small hand files are used to avoid apical transport. Then, nickel-titanium rotary systems or reciprocating files are selected. The irrigation protocol is expanded: sodium hypochlorite dissolves tissues, EDTA removes the smear layer. Ultrasonic or passive sonic methods are used for activation. The vapor lock in the canal is broken. Apical negative pressure reduces the risk of extrusion. Drying is performed with paper cones. An antimicrobial interproximal medicament is applied if necessary. The goal is three-dimensional cleaning and preparation. This prepares the ground for a tight obturation. Irrigant safety and soft tissue protection are maintained throughout all steps.
Irrigation steps:
- Organic tissue dissolution with NaOCl
- Smear removal with EDTA
- Activation (ultrasonic/sonic)
- Apical negative pressure
- Sterile drying and control
Reducing the Risk of Perforation and Fracture
In posts, the walls may be thinned. Therefore, preventing iatrogenic damage during revision root canal treatment is a priority. Access should be conservative, and instruments should be new and elastic. Excessive taper weakens the remaining dentin; therefore, minimal shaping is preferred. The binding of files and torsional load are carefully monitored.
Worn files are immediately discarded. Dentin thickness in suspicious areas can be verified with CBCT. If perforation occurs, it is immediately closed with biocompatible materials. The free movement of the irrigation needle is checked at every stage. Lateral forces are reduced. Progress is monitored with interim radiographs as the process advances. Safety is prioritized over treatment speed. This significantly reduces the likelihood of fracture and perforation.

Risk reduction tactics:
- Minimal taper and protective shaping
- Use of new, unused instruments
- Frequent inter-proximal control radiographs
- Avoidance of excessive heat and pressure
- Rapid biomaterial repair in case of perforation
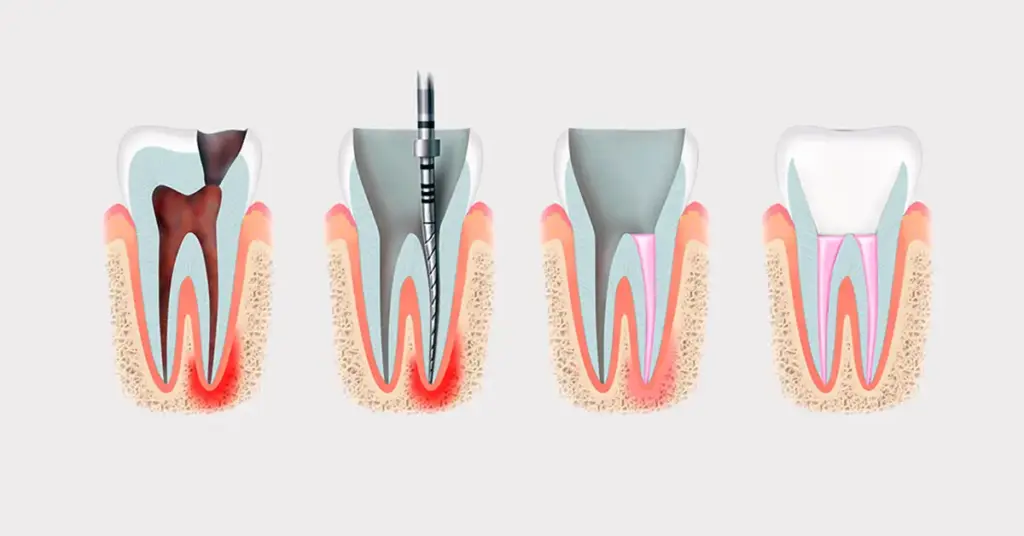
Restorative Plan, Obturation, and Prognosis
Once cleaning is complete, obturation is planned. Single cone + sealer, hot vertical, or thermoplastic technique is selected based on case characteristics. Coronal seal determines success. The need for a post is reevaluated. If sufficient dentin remains, the need for a post decreases. If necessary, short, passive fiber posts and adhesive systems are preferred. A ferrule of at least 1.5–2 mm is targeted. Occlusal stresses are balanced.
Periodontal care and bruxism control enhance long-term stability. Follow-up appointments are scheduled. Clinical and radiographic improvement is monitored. The prognosis after revision root canal treatment is directly related to the quality of seal, elimination of infection, and restorative integrity. A clear, measurable follow-up plan also facilitates patient communication. Success emerges at the intersection of biology, mechanics, and patient compliance.
Follow-up recommendations:
- 6–12 month radiographic check-up
- Occlusal adjustment and plaque education
- Coronal seal check
- Symptom diary and feedback
- Splint application if necessary
Follow our social media accounts to see the amazing results.
Revision Root Canal Treatment – FAQ
What is revision root canal treatment, and why is it performed differently when a post is present?
It eliminates infection and restores seal in a previously treated tooth. Since the post narrows the canal and increases the risk of fracture, the procedure is more conservative, performed under enlargement, and with controlled forces.
In which cases is revision root canal treatment indicated?
It is indicated in cases of persistent pain, fistula, periapical lesions on radiographs/CBCT, leaking restorations, or failed previous fillings; remaining dentin, ferrule, and periodontal support must be evaluated.
How is the post removed during revision root canal treatment; does the approach differ for fiber and metal posts?
After coronal exposure, the retention is broken using ultrasonic vibration and appropriate burs under magnification. Stepwise trepanation is used for fiber posts; heat/vibration and, if necessary, a post extraction device is preferred for metal posts.
How many sessions does revision root canal treatment take, and is the procedure painful?
Depending on the difficulty of the case, it can take one or several sessions. With proper anesthesia and isolation, pain is not expected during the procedure; mild sensitivity after the procedure is normal and subsides quickly.
Does revision root canal treatment increase dentin loss; how is the risk of fracture/perforation reduced?
The risk is reduced by conservative access, minimal taper, use of new-elastic instruments, and avoidance of excessive heat and lateral force. CBCT verification and interim control radiographs in cases of suspected thin walls increase safety.
Why do irrigation and reshaping play a critical role in revision root canal treatment?
Effective irrigation with NaOCl and EDTA, ultrasonic/sonic activation, and apical negative pressure remove biofilm/smear layer, break vapor lock, and prepare the ground for tight obturation.
Is a post required after revision root canal treatment; how is the restorative plan made?
If there is sufficient remaining dentin, the need for a post is reduced. If necessary, short, passive fiber posts and adhesive systems are preferred; a minimum of 1.5–2 mm of ferrule is targeted, and coronal seal is prioritized.
What determines the success of revision root canal treatment, and what should the follow-up schedule be?
Seal quality, elimination of infection, and restorative integrity are the main determinants. Clinical/radiographic control at 6–12 months, occlusal adjustment, plaque education, and bruxism management (splint if necessary) are recommended.